This article explains the process to enable SSL/TLS authentication on Tomcat.
Prerequisites
- You will need access to a trusted Certificate Authority (CA).
- If you do not have access to a trusted CA, you will need OpenSSL.
- You will need Perl.
Create Self-Signed Certificates Using OpenSSL
Note: If you have access to a trusted Certificate Authority (CA) and already have the cacert.pem, servercert.pem and serverkey.pem files, skip to Generate Keystores.
To create a self-signed certificate using OpenSSL, perform the following steps:
- Locate OpenSSL CA.pl file as this file is required to create a dummy CA certificate file. This will be inside the bin directory within the OpenSSL directory.
- Create a temporary directory to store the certificates and navigate to it in the command line
- Execute the following command based on your operating system (you may need to edit the path accordingly)
Linux
/usr/lib/ssl/misc/CA.pl -newca
Windows
C:\OpenSSL-Win32\bin\CA.pl -newca
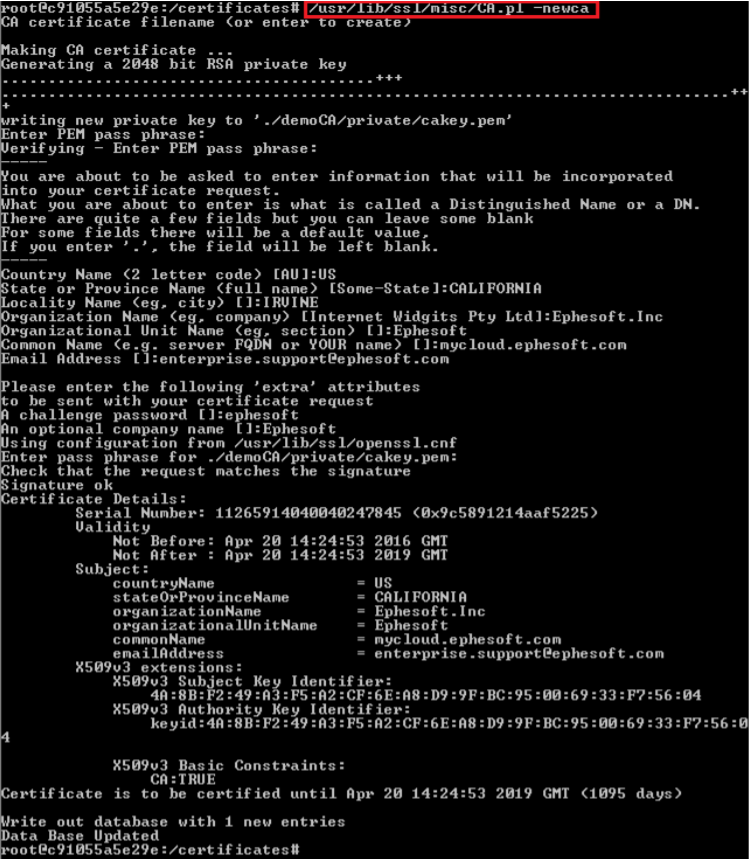
This creates demoCA/cacert.pem (CA Certificate) and demoCA/private/cakey.pem (private key)
- Make a server certificate signing request (CSR) using the following command:
openssl req -newkey rsa:2048 -nodes -keyout newreq.pem -out newreq.pem
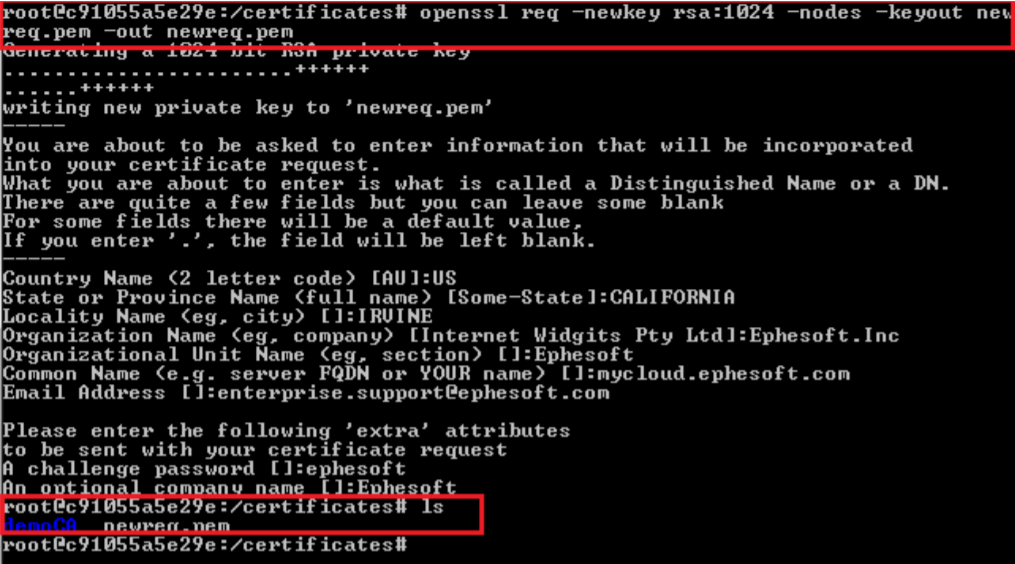
Note: The Common Name is the fully qualified domain name (FQDN) of your server. This must match the servername/hostname.
- Execute the following command based on your operating system. You may need to edit the path accordingly.
Linux
/usr/lib/ssl/misc/CA.pl -sign
Windows
C:\OpenSSL-Win32\bin\CA.pl -sign
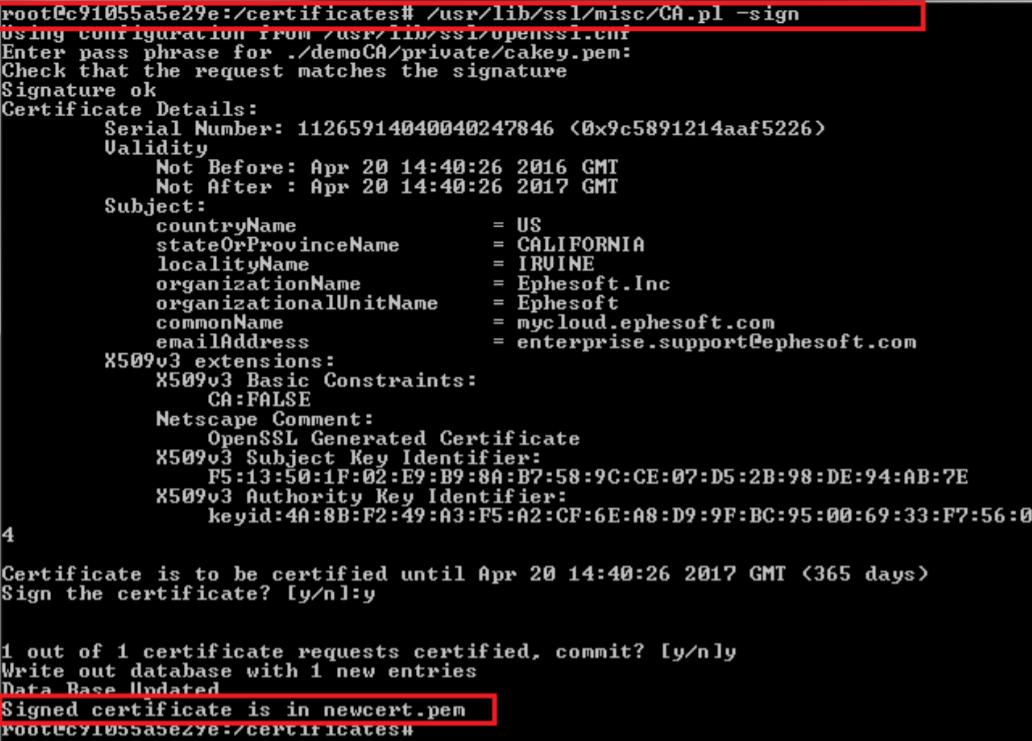
You should have the following three files:
- cacert.pem
- newreq.pem
- newcert.pem
- Rename newreq.pem to serverkey.pem.
- Rename newcert.pem to servercert.pem.
Generate Keystores
You should have the following three files:
- cacert.pem
- serverkey.pem
- servercert.pem
- Convert the servercert.pem file to PKC12 format (*.p12) using the following command:
openssl pkcs12 -export -in servercert.pem -inkey serverkey.pem -out servercert.p12 -name servercertificate
Note: The converted file (servercert.p12) acts as a server certificate and is used to generate keystore. When prompted for Export Password, enter a password and keep the password safe.
- Create a java keystore file by converting the servercert.p12 file to Java Keytool format by using the following command:
keytool -importkeystore -destkeystore servercert.jks -srckeystore servercert.p12 -srcstoretype PKCS12 -alias servercertificate
Note: When prompted for the destination keystore password, enter a password and keep it safe. It will be used as the keystore password in the server.xml file. Also, when prompted for the source keystore password, enter the export password for input servercert.p12 file created in the previous step (Step 8).
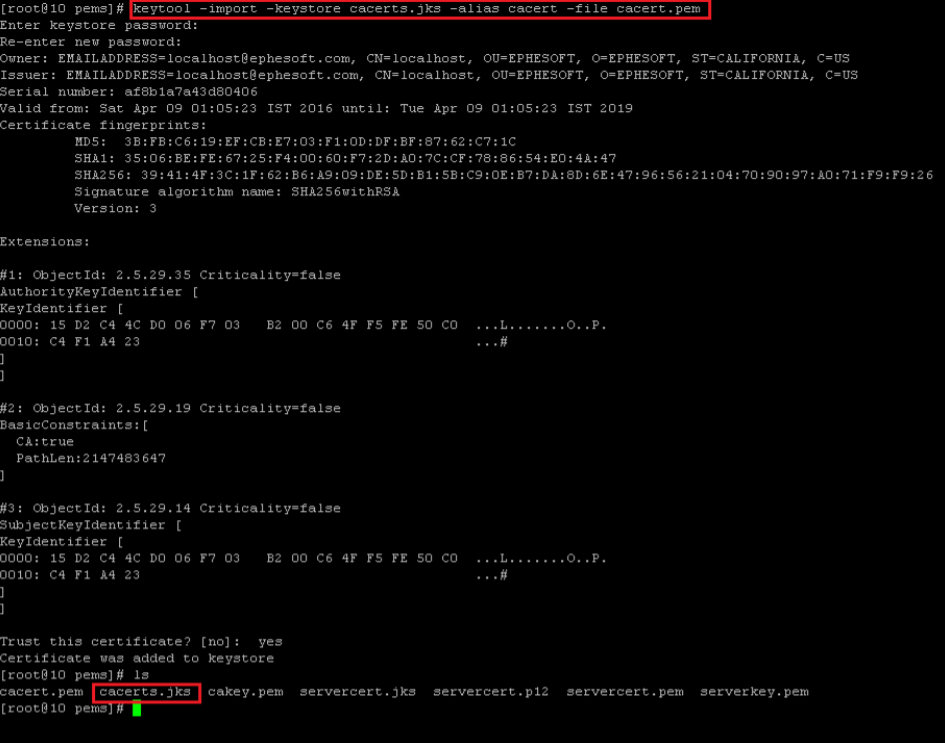
- Navigate to the demoCA directory (cd demoCA) and create a java truststore file by converting the cacert.pem file to Java Keytool format by using the following command:
keytool -import -keystore cacerts.jks -alias cacert -file cacert.pem
Note: When prompted for keystore password, enter a password and keep the password safe. It will be used as the truststore password in the server.xml file.
Generate a Certificate Signing Request (CSR)
- Create a new key-CSR pairing
keytool -genkey -alias servercertificate -keyalg RSA -keysize 2048 -keystore servercert.jks
- Enter your DN information and confirm it with a “yes” when prompted
- Create a new Certificate Signing Request (CSR)
keytool -certreq -alias servercertificate -keyalg RSA -file yourdomain.csr -keystore servercert.jks
- Enter your keystore password.
- Send the CSR to your Certificate Authority (CA).
- Make a copy of servercert.jks and rename the copy file as cacerts.jks.
- Once you have received the cacert.pem and servercert.pem from your CA, execute the following commands to import the certificates.
keytool -import -keystore cacerts.jks -alias cacert -file cacert.pem
keytool -import -keystore servercert.jks -alias servercertificate -file servercert.pem
Configure SSL/TLS Using Generated Certificates
To configure SSL/TLS in Ephesoft Transact, perform the following steps.
- Take a backup of the existing server.xml file located at [Ephesoft_Directory]/JavaAppServer/conf.
- Open the server.xml in edit mode and locate the existing HTTP/HTTPS connector.

- Comment the existing connector by surrounding the connector tag in comment tags.

- Locate the comment “Connector for enabling PIV/CAC configuration”. Uncomment the following lines:

This connector includes the following configurable properties:
| Property | Value |
| protocol | org.apache.coyote.http11.Htp11NioProtocol |
| port | 8080 (or 8443)
Note: You can change this from the default 8080 but take note of this for the following sections. |
| maxThreads | 2000 |
| clientAuth | false |
| scheme | https |
| keepAliveTimeout | -1 |
| connectionTimeout | 900000 |
| secure | true |
| SSLEnabled | true |
| sessionTimeout | 30 |
| truststoreFile | Complete path of truststore file location.
Example: “C:\Ephesoft\certs\truststore.jks” |
| truststorePass | Password for truststore. |
| keystoreFile | Complete path of keystore file location.
Example: “C:\Ephesoft\certs\truststore.jks” |
| keystorePass | Password for keystore. |
| maxKeepAliveRequests | 200 |
Note: Make sure you replace the path of the certificates with the actual certificate locations.
The following files will also need to be configured:
- dcma-batch.properties
- dcma-workflows.properties
- web.xml
dcma-batch.properties
This file is located at [Ephesoft_Directory]\Application\WEB-INF\classes\META-INF.
- Take a backup of the dcma-batch.properties file.
- Update the batch.base_http_url to include https protocol, the correct port, and correct hostname (see note for versions 2020.1.06 and above).
![]()
Note: For 2020.1.06 and above, the batch.base_http_url should include /dcma after the port, such as:
batch.base_http_url=https\://localhost\:8443/dcma/dcma-batches
dcma-workflows.properties
This file is located at [Ephesoft_Directory]\Application\WEB-INF\classes\META-INF.
- Take a backup of the dcma-workflows.properties file.
- Update the wb.hostURL to include https protocol, correct port, and correct host.
![]()
web.xml
Note: This step is only necessary if you have changed the port from the default 8080.
This file is located at [Ephesoft_Directory]\Application\WEB-INF.
- Take a backup of the web.xml file.
- Modify the following <context-param> entries:
| Parameter Name | Updated Value |
| port | Enter the port listed in the server.xml file. Update this only if you have updated the port number.
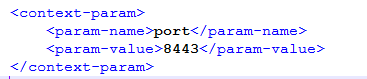 |
| protocol | Enter https.
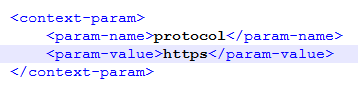 |
- Restart the Ephesoft Transact service.
Install Certificates
- Copy the cacert.pem to the [Ephesoft_Directory]\Certs folder.
- Rename the file extension to crt (cacert.crt).
- Right-click the cacert.crt file and select Install Certificate.
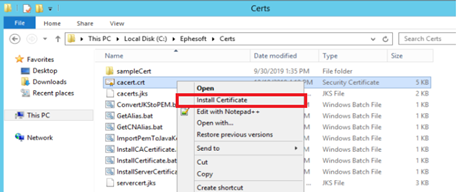
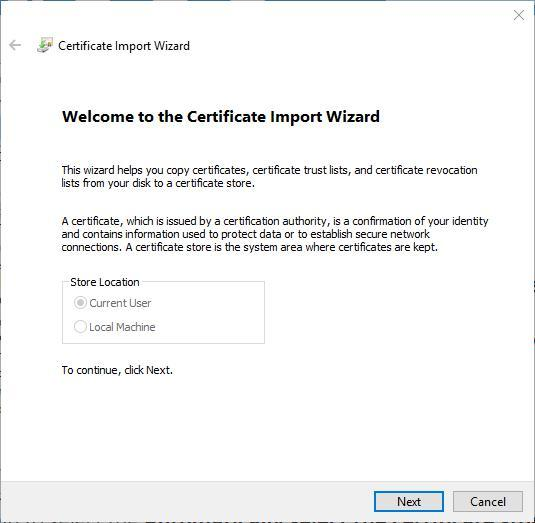
The Certificate Import Wizard will run.
- Select Local Machine and click Next.
- Select Place all certificates in the following store and click Browse. This will open a dialog prompting you to select the certificate store.
- Select Trusted Root Certification Authorities and click OK.
- Click Next and Finish to complete the import.
- Verify the certificate imported successfully.
- From the taskbar, search “cert”.
- Select Manage computer certificates.
- Go to Trusted Root Certification Authorities > Certificates and verify your certificate is listed on the right-hand side.
- Open Ephesoft Transact with https.
Conclusion
This completes the overview of how to enable SSL/TLS authentication on Tomcat.